Creating an FPSC account is more than a routine signup. It is the foundational step in applying for federal government jobs in Pakistan, and getting it right is essential. The process begins long before you even visit the website. To ensure a smooth experience, applicants must gather key materials in advance. This includes having a valid CNIC, a working email address, a compatible web browser, and a recent, properly sized digital photograph.
These may sound like simple requirements, but they are often the source of preventable delays. Without these essentials ready, the registration cannot be completed successfully. The guide emphasizes this preparation stage so that when you begin the process online, you are not interrupted by missing documents or incompatible formats. It also advises checking your internet connection and browser settings to avoid issues like slow loading or login failures.
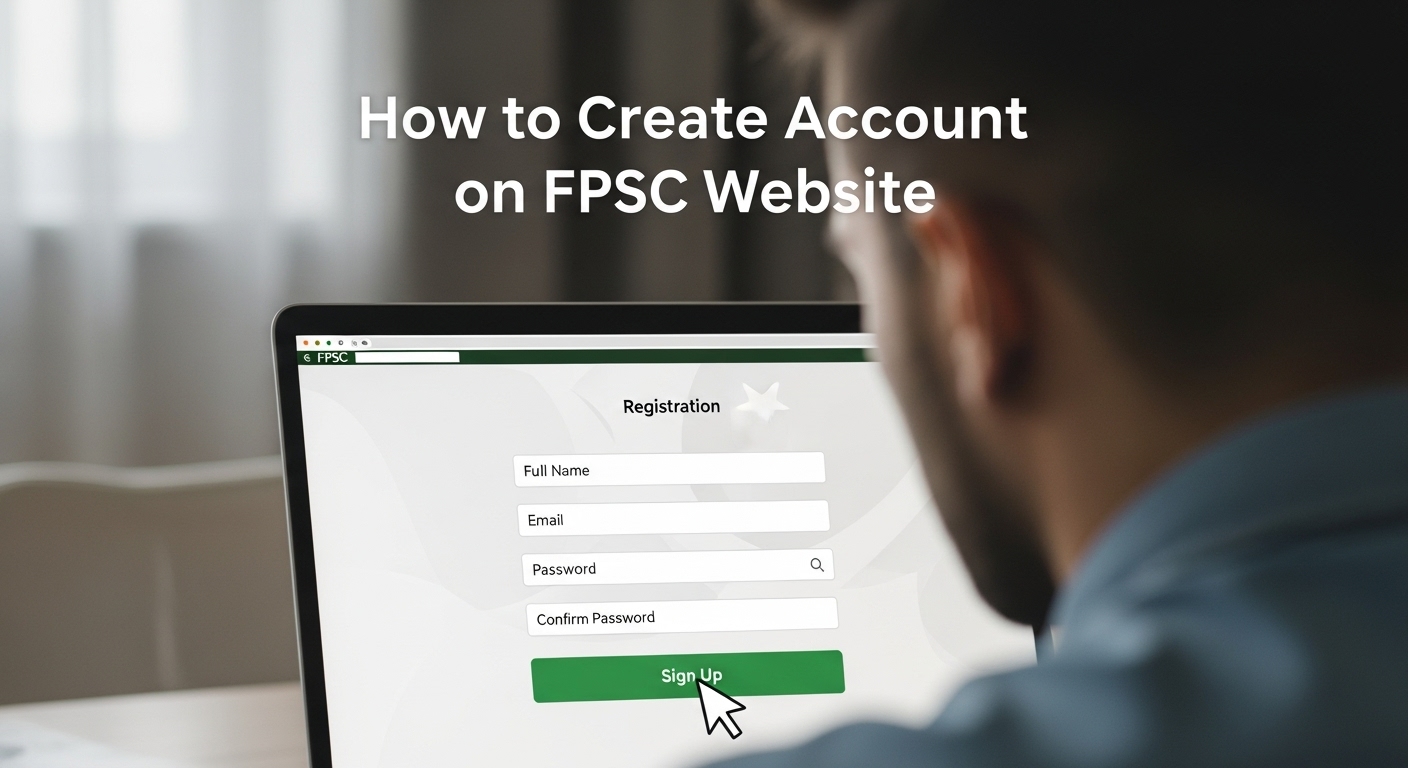
Once everything is ready, the actual registration on the FPSC portal involves filling out a detailed form. This step demands accuracy and attention. You will be required to input your full name, CNIC number, contact information, and a strong password, along with solving a CAPTCHA for security. The guide makes it clear that certain fields, such as your name and CNIC, are locked once submitted, which means you cannot change them later.
Because of this, double-checking every entry is vital. Tips are provided on how to create a username that meets FPSC’s requirements and how to avoid common errors like using special characters or unsupported email domains. There are also practical solutions for technical hiccups, such as when a CAPTCHA does not load properly or when the portal lags during submission. These small details can make the difference between completing your registration on the first try and having to start over again.
After successful registration, the focus shifts to building your profile. This phase involves logging into your new account and entering your personal and academic information with precision. You must upload your photograph and input your qualifications in the required format to ensure they are accepted by the system.
The guide walks you through each section and provides troubleshooting advice for common user errors like triggering validation alerts or missing mandatory fields. Additionally, it covers how to deal with forgotten passwords, duplicate CNIC registrations, and session timeouts, all of which are issues that many users face. If you run into persistent problems, you are encouraged to reach out to FPSC’s helpline or email support. By the end of this process, your account and profile should be complete and ready for job applications. With the right preparation and care, you can register without frustration and begin your FPSC journey on the right foot.
Step 1: Preparation Before You Begin
Before you even open the FPSC website, it’s essential to gather all the necessary materials and set up your environment properly to avoid interruptions or errors during registration.
Preparation Step | Details |
Have your Computerized National Identity Card (CNIC) ready | The CNIC number is mandatory for registration. Make sure you have the correct number without dashes (e.g., 1234512345671). |
Choose the right device and browser | Use a desktop or laptop computer rather than a mobile phone for better compatibility. Recommended browsers are Google Chrome, Mozilla Firefox, or Internet Explorer 8.0 or above. These browsers handle the FPSC website’s scripts and forms best. |
Ensure a stable internet connection | Interruptions in internet connectivity can cause form submission errors or session timeouts. |
Prepare a valid email address | This email will be your primary communication channel with FPSC. It must be active and correctly spelled. |
Have a digital passport-sized photograph ready | The photo must be in JPEG format and less than 30 KB in size. This is required later during profile creation. |
Gather your educational qualification details | Know the exact names of your degrees, institutions, result dates, and grades to enter them accurately. |
Keep a pen and paper handy | To note down your login credentials and any confirmation numbers during the process. |
Step 2: Accessing the FPSC Website
- Open your chosen web browser.
- Type www.fpsc.gov.pk in the address bar and press Enter.
- The official FPSC homepage will load. This is the portal for all FPSC services.
- Alternatively, you can directly access the Online Recruitment System by entering online.fpsc.gov.pk in the browser.
Troubleshooting Tips:
- If the website does not load, check your internet connection.
- Clear your browser cache and cookies if the page appears broken or outdated.
- Disable any VPN or proxy services as they might interfere with website access.
- If the site is down for maintenance, try again after some time.
Step 3: Navigating to the Registration Page
Step | Details |
1 | On the FPSC homepage, locate the menu or section labeled “Apply Online” or “Online Recruitment System” and click it. |
2 | You will be redirected to the login page of the recruitment system. |
3 | Look for a button or link named “New User” or “Register” and click it to start the registration process. |
Troubleshooting Tips:
- If the “New User” option is not visible, refresh the page or try a different browser.
- Avoid using browser back and forward buttons excessively; use the website’s navigation links.
Step 4: Filling Out the Registration Form
This is a critical step where accuracy is paramount. The system will not allow you to proceed if mandatory fields are left empty or incorrectly filled.
You will be asked for:
Field | Instructions |
Full Name | Enter your full name exactly as it appears on your Matriculation certificate. Avoid abbreviations or nicknames. |
Login Name | Choose a unique username that you will remember easily. It can only contain alphabets (A-Z, a-z) and numbers (0-9). No special characters or spaces are allowed. |
Password | Create a password with at least 6 characters. It is case-sensitive, so mix uppercase and lowercase letters if possible for strength. |
Confirm Password | Re-enter the same password exactly as above. |
Email Address | Enter a valid email address that you actively use. This is where you will receive notifications and password recovery links. |
CNIC Number | Enter your 13-digit CNIC number without dashes. |
Verification Code | Enter the CAPTCHA code exactly as shown to prove you are not a robot. |
Before submitting, carefully review every field. Once submitted, your CNIC, name, and email address cannot be changed.
Troubleshooting Tips:
- If the form does not submit, check for any red asterisks indicating missing mandatory fields.
- If you get an error about the login name being taken, try a different username.
- Make sure the email format is correct
- If the CAPTCHA is hard to read, click the refresh button beside it to get a new code.
- Avoid using the browser’s autofill for critical fields like CNIC or email; type them manually.
Step 5: Submitting the Registration Form
Step | Action |
1 | Click the “Submit” button once all fields are completed. |
2 | Wait patiently as the system processes your registration. |
3 | Upon success, a confirmation message will pop up stating your registration was successful. |
4 | Click “OK” to proceed. |
Troubleshooting Tips:
- If the page freezes or gives an error after submission, try refreshing the page and logging in with your credentials.
- Do not click the submit button multiple times to avoid duplicate registrations.
- If you receive an error about duplicate CNIC or email, it means you have already registered. Use the “Forgot Password” option to recover your account.
Step 6: Logging In to Your New Account
Step | Action |
1 | After registration, you will be redirected to the login screen. |
2 | Enter your chosen Login Name and Password. |
3 | Click “Login”. |
4 | If the credentials are correct, you will be taken to your dashboard. |
Troubleshooting Tips:
- If login fails, double-check your spelling and case sensitivity of the password.
- Use the “Forgot Password” link to reset your password via your registered email.
- Clear browser cache or try a different browser if login issues persist.
Step 7: Creating or Updating Your Profile
Once logged in, your next task is to create a detailed profile that will be used for all applications.
- Click the “Create/Update Profile” or “My Profile” option.
- Your name and CNIC will be pre-filled and cannot be changed.
- Fill in the following mandatory details (marked with *):
Field | Instruction |
Date of Birth | Use the calendar picker or enter in the correct format (DD/MM/YYYY). |
Father’s Name | Enter as per official documents. |
Domicile | Select your province or region from the dropdown. |
Gender | Select Male or Female. |
Marital Status | Choose Single, Married, etc. |
Contact Information | Provide your current phone number and postal address. |
Upload your passport-sized photograph by clicking “Browse” or “Upload”, selecting the JPEG file under 30 KB.
Enter your educational qualifications starting from the highest degree relevant to the exam/job:
Degree name (e.g., Bachelor of Science)
Board or University name
Result declaration date
Grade, division, or CGPA
Save each qualification before adding the next.
If applicable, indicate any disability and whether you require assistance.
After completing all sections, click “Save”.
Troubleshooting Tips:
- If photo upload fails, check file size and format.
- If the system does not allow saving, ensure all mandatory fields are filled.
- Use the “Edit Profile” option to correct any mistakes before final submission.
- Avoid using special characters in text fields to prevent system errors.
Step 8: Verifying Your Profile Information
Step | Action |
1 | Review the profile summary carefully. |
2 | Make sure all information matches your official documents. |
3 | Use the “Edit Profile” option if you find any mistakes. |
4 | Confirm that your photograph is clear and properly uploaded. |
Troubleshooting Tips:
- If you cannot edit some fields, it may be because they are locked after initial entry; contact FPSC helpline for assistance.
- Save changes after every edit to avoid data loss.
Step 9: Completion of Account Creation
- Your account and profile are now fully created.
- You can now apply for FPSC exams or jobs using this account.
- Keep your login credentials safe and remember your registered email for future communications.
- Log out securely after each session.
Common Issues and How to Troubleshoot Them Effectively
Issue | Problem | Solution |
1. Website Access and Navigation Issues | FPSC website is slow, unresponsive, or down. | Check your internet connection; try clearing browser cache; use recommended browsers; try accessing during off-peak hours; if persistent, contact FPSC helpline at 051-111-000-248. |
2. Registration Form Errors | Form does not submit or shows errors. | Ensure all mandatory fields are filled; verify CNIC and email format; refresh CAPTCHA; try a different username if “Login Name” is taken; avoid special characters; use desktop browser. |
3. Duplicate Registration or CNIC Already Exists | System says CNIC or email already registered. | Use “Forgot Password” to recover your account; do not create multiple accounts with the same CNIC. |
4. Login Problems | Cannot log in after registration. | Check username and password carefully; reset password using registered email; clear browser cache; try another browser. |
5. Profile Creation Issues | Cannot upload photo or save profile. | Ensure photo is JPEG and less than 30 KB; fill all mandatory fields; avoid special characters; save qualifications one by one; if disability section is irrelevant, skip it. |
6. Application Submission Errors (Post Account Creation) | Application rejected due to incomplete or incorrect information. | Double-check all profile and application entries before submission; remember you can edit the application only once before the closing date; keep original Treasury Receipt of fee payment for verification. |
7. Forgotten Credentials | Forgot login name or password. | Use the “Retrieve Tracking ID” or “Forgot Password” options on the login page; follow email instructions to reset. |
8. Technical Glitches or System Timeouts | Session expires or page freezes. | Avoid long inactivity; save data frequently; use stable internet; if problem persists, log out and log in again. |
Additional Support
- FPSC provides a helpline at 051-111-000-248 during office hours for technical assistance.
- Email support is available at fpsc@fpsc.gov.pk.
- Candidates without internet access can submit applications on plain paper addressed to Secretary FPSC before the closing date.
- Always apply well before the deadline to avoid last-minute technical issues.